Just a quick post today to wish everyone a happy, healthy and prosperous New Year!
It's an amazing 11 degrees C (though raining) today. I think that's a pretty good start to 2011. With the holidays winding down it will be time to think about crafting again. Is it too early to dream about gardening too? I figure we have about 3 and half months of yucky weather till the garden shows much sign of life. I'm sure it will make us enjoy the spring and summer months even more.
Happy 2011!
Saturday, January 1, 2011

Thursday, October 21, 2010
Silhouette Blog Giveaway
Just popping to tell readers there is a great Silhouette blog giveaway today. Follow the Silhouette link (My Favourite Toy) on the right. Good Luck!
Saturday, August 21, 2010
Rosette Card
I created this card using my Silhouette to cut out the rosette and borders. The rosette reminds me of the large rose stained glass window behind the choir loft of the church where I was married. The Cathedral of Christ the King in Hamilton (where I occasionally sing with the diocesan choir) also has a gorgeous rose stained glass window.
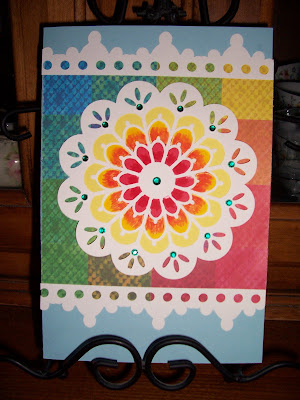
The patterned paper was from a pad purchased at the dollar store!

The patterned paper was from a pad purchased at the dollar store!
Friday, August 20, 2010
Gift Wrapping Embellishment
I recently wrapped this large gift and wanted to decorate the package without using the usual large bow. Instead, I cut embellishments using my Silhouette. I used flourishes cut from green cardstock and cut 3 large flowers (with a rhinestone centre) in colours that complemented the colours found in the wrapping paper. I think odd numbers of embellishments look better than even. Don't you agree?

One advantage to using a flat embellishment rather than a bow is that you do not have to worry about the decoration getting squashed in transit!

One advantage to using a flat embellishment rather than a bow is that you do not have to worry about the decoration getting squashed in transit!
Thursday, August 19, 2010
Wedding Card

My daughter attended a wedding a while ago, and I offered to create a special wedding card for the occasion. The card and embellishment were cut out using my Silhouette. The sentiment is a Stamp'n Up stamp that belongs to a set that I won from Stamp4fun . Thanks again, Lynda and Tammy!
Wednesday, March 24, 2010
Earth Hour Tablescape
I have a rather unorthodox tablescape for you this week. It is a tribute to Earth Hour 2010.
 In March 2009, hundreds of millions of people took part in the third Earth Hour. Over 4000 cities in 88 countries officially switched off to pledge their support for the planet, making Earth Hour 2009 the world’s largest global climate change initiative.
Earth Hour 2010 takes place on Saturday 27 March at 8.30pm (local time) and is a global call to action to every individual, every business and every community throughout the world. This year over 120 countries and territories are participating. It is a call to stand up, to take responsibility, to get involved and lead the way towards a sustainable future. Iconic buildings and landmarks from Europe to Asia to the Americas will stand in darkness. People across the world from all walks of life will turn off their lights and join together in celebration and contemplation of the one thing we all have in common – our planet. (Source http://www.earthhour.org/)


If you look closely at the placemat, you will see that it is actually a bus schedule. We could greatly reduce our carbon footprint if we would take public transit when possible.

I have placed an unusual ornament in the middle of my centrepiece. It is a solar light (borrowed from our garden). We have much larger solar panels on our roof which are capable of producing 500Watts of energy on a sunny day.

Clothespins anchor the corners of the napkin centred on the table. This is to remind us to use our 'passive wind generated clothes dryer' (ie. clothesline) rather than the electric dryer when possible.
The plates,napkins and cutlery are reuseable, of course. Our landfills are reaching capacity. It makes sense to avoid the use of disposable materials when appropriate. In fact the cloth napkins and napkin rings were purchased at a thrift shop. If we have no further use for items it is better to donate them to a thrift store, have a garage sale or give the items to someone who can use them rather that just throwing them out.
In our municipality we must sort our refuse into paper products, containers (bottles and cans), which are recycled, and organics and yard wastes which are composted. We are limited to one garbage bag per week. It is rare that we even fill it.

My dinner guest, Mr. Grey, a visiting dignitary from Area 51 agrees that it is in all our interest to be good stewards of our planet. After all, Earth is our home.


Tuesday, March 23, 2010
Spring's Baby Steps
 Today I'm excited to be participating in Outdoor Wednesday for the very first time!
Spring is just starting in Southern Ontario. No glorious trees laden with blossoms, alas. The temperature still frequently drops below freezing overnight. We did have spectacularly warm weather for March break. Unfortunately we have fallen back to more seasonable temperature ranges.
There are some hopeful signs:

Buds on daffodils,
 daylillies poking up through the ground,
 sedum sprouting through the cracks,
 A glorious blue sky...
So I will ignore the snow in the forecast for next week (sigh), and enjoy the first stirring of spring!
Birdhouse Favour Box

I used pastel coloured cardstock to create this springtime favour box. The blue and ivory colours remind me of Wedgewood. The birdhouse box, flourishes and butterfly are all Silhouette patterns.

Monday, March 22, 2010
Picture Frame Embellishment
I took a plane clear acrylic picture frame purchased at the dollar store and embellished it with a vinyl rose cutout. Once again I put the Silhouette to good use.

I could see using this method to create a desk sign or perhaps a table number at a reception. Anyone planning a wedding?

I could see using this method to create a desk sign or perhaps a table number at a reception. Anyone planning a wedding?
Saturday, March 20, 2010
Birthday Card for Sarah

My daughter went to a birthday party yesterday and brought along this butterfly birthday card. The flowers, birthday caption and butterfly are all cut from cardstock using the Silhouette. Happy birthday Sarah!
Friday, March 19, 2010
Mailbox Gets a Makeover
I wanted to try cutting out vinyl with my Silhouette and needed an uncomplicated project. I decided to add a white vinyl flourish to my plain, rather boring black mailbox. Voila!


Not so boring any more! I think I shall go a bit crazy now slapping vinyl embellishments on all sorts of things!


Not so boring any more! I think I shall go a bit crazy now slapping vinyl embellishments on all sorts of things!
Thursday, March 18, 2010
Card with a Mission

This dragonfly card is my contribution to the Taylored Expressions Card Drive. The cards will be donated to the NICU nurses at Sanford Medical Center in Sioux Falls, SD where they use the dragonfly as a symbol of hope for families who have lost a child during delivery or in the early stages of life.
For more information visit:
Taylored Expressions: Dragonfly Card Drive - TESC101
The mailing address for donations is:
Taylored Expressions Card Drive
924 NW 33rd StreetAnkeny, IA 50023
Wednesday, March 17, 2010
Sláinte (To your Good Health)

Happy St. Patrick's Day!
I just thought I would share some special cards I created to celebrate the occasion. These were all created using cutouts made with my Silhouette digital cutter.
Hope you have a wonderful day!


Saturday, March 13, 2010
Paper Mache Creation
Many apologies for my lengthy hiatus from blogging. I've been quite busy with a variety of projects including this one:
It starts off with a large balloon covered in paper mache - paper strips generously coated with a goo of white glue and water.

After I have a few layers of newspaper, I add some layers of paper towel, and glue goo.

Now it's time to add some 3D features to my creation. I used expanding spray insulation (like they use for around pipes) to build up some cheeks, a chin and an ear.

Looks a little bulbous, but a bit more like a face and less like an egg. When it's dry the foam can be carved with a knife to refine the features a bit.

Time to add some more paper mache. Then paint and add a stocking cap.

Putting it together with the rest of the costume and we have: Bonhomme! Bonhomme is the snowman ambassador to the Quebec Winter Carnival. This Bonhomme was created for an elementary school winter carnival.

What a handsome fellow! Bonhomme and the Winter Queen were quite a hit. Seeing all the kids' happy faces made it worth all that work.
Friday, January 1, 2010
Happy New Year!!!
New Years Day is traditionally a time for contemplating last year's blessings and setting new goals. One of my goals for 2010 is to do something creative every day. I thought it might be fun to share my creative journey with everyone in Blogland.
One of the projects I've started is knitting a new scarf. Before Christmas I helped my daughter shop for a new hat and scarf for her sister. I was surprised at how expensive they were! I decided that my knitting skills were up to the task of knitting a scarf or two or three. The price of yarn and needles was approximately one third of the retail price of a scarf.
One of the projects I've started is knitting a new scarf. Before Christmas I helped my daughter shop for a new hat and scarf for her sister. I was surprised at how expensive they were! I decided that my knitting skills were up to the task of knitting a scarf or two or three. The price of yarn and needles was approximately one third of the retail price of a scarf.

I was able to complete one just in time for Christmas and am currently working on a second. This one might be a gift for next Christmas or I might just keep it myself! It is going together pretty quickly using chunky textured yarn and size 9mm needles.
I have some other crafty projects up my sleeve too. I am currently working on a wedding scrapbook album and I plan on making lots of cards. It's going to be a busy year!
Sunday, November 8, 2009
12 Weeks of Christmas Week : 6 Shopping

This is week 6 of the 12 weeks of Christmas! Hard to believe that there are only 47 days till Christmas! This week's topic is Shopping.
I love shopping, which is fortunate, since, as much as I enjoy it, my spouse dislikes it. His idea of shopping is browsing in the electronics store or bookstore. I enjoy the 'thrill of the hunt'. I am twice as pleased with a purchase if I found it on sale. Here are a few pointers to help you with your shopping.
1. Shop throughout the year. Even if you don't purchase your gifts right when you find them, shop for gift giving ideas. You have the best chance of finding what you want in the size you need if you start early. If you leave your shopping till the last minute you are more likely to overspend out of desperation. Plus, you don't have to fight for parking or shop in less than wonderful weather.
2. If a great gift idea comes to mind - write it down. I keep a journal just for that purpose. Pay attention to people's hobbies and preferences.
3. Consider buying at a thrift store or garage sale. You can often find BRAND NEW items for a fraction of the price of retail. Plus, you save yourself the sales tax. Remember that a dollar saved is MORE than a dollar earned because you shop with after-tax dollars.
4. Gift certificates can make great gifts if they are for businesses that you KNOW the person frequents. Some of our drugstores here stock gift cards for a variety of stores, not just their own. This can save time. In Canada gifts cards, by law, do not expire. Check out what protection the law gives you where you live. In Canada there are frequently terrific Boxing Week sales (particularly on electronics) so the the gift card recipient can stretch those dollars.
5. Homemade certificates for services like snow shoveling, or babysitting are really appreciated.
6. Pool your money with other family member members to buy one large gift rather than individual gifts.
7. Get gift receipts when possible and check out the store's return policy. Keep all the receipts in one location just in case you need to return something.
8. Homemade gifts add a personal touch. Just be sure to start them well in advance. You don't want to be knitting that second slipper on Christmas Eve!
I have most of my Christmas shopping already done for this year (please don't hate me). I hope to be totally finished by the end of November. So if you are out there in that crowded mall on Dec. 24th, don't look for me. And good luck!
I'm sure the others linking to Red Writing's blog have lots to share about Christmas shopping too. Let's have a look!
Thursday, November 5, 2009
12 Weeks of Christmas Week 5:Homemade Gifts
This week on the "12 Weeks of Christmas" the focus is on homemade gifts. I have a couple ideas up my sleeve, but I'm not going to post them here just in case anyone I know actually reads this blog! Here are a couple of ideas that I CAN share. I can't really take credit for any of them.

Altered clipboards: Clipboards can easily be found at dollar stores. They don't have to remain plain and boring though. Maureen Spell at Scrapjazz has a great tutorial on how to jazz them up here .
 Decorated Candles:
Plain pillar candles can be decorated by stamping images on tissue paper and melting them onto the candle wax using an embossing gun. You can find a tutorial here .
For other fantastic gift-making ideas, check out Red Writing's blog.

Altered clipboards: Clipboards can easily be found at dollar stores. They don't have to remain plain and boring though. Maureen Spell at Scrapjazz has a great tutorial on how to jazz them up here .
 Decorated Candles:
Plain pillar candles can be decorated by stamping images on tissue paper and melting them onto the candle wax using an embossing gun. You can find a tutorial here .
For other fantastic gift-making ideas, check out Red Writing's blog.
Saturday, October 31, 2009
12 Weeks of Christmas Week 4:All About the Food
I have two Christmas recipes that I would like to share. These have become traditions in our family.
Egg Nog Pie
This recipe is surprisingly light. I usually serve it for dessert for our turkey dinner. If you prepare the graham crust yourself using a non-sugar sweetener, it is suitable for diabetics.
Ingredients:
Prepare the Jello pudding mix with half the milk called for in the directions. Add nutmeg and rum extract. Fold in the Cool Whip. Fill pie crust. Garnish with marachino cherries and a sprinkle of nutmeg. Chill. May be prepared ahead of time and frozen. Just thaw on the day you plan to serve it.
If you are unconcerned about your calorie intake, you could used regular Cool whip and Jello pudding mix.
******************************

If you are hungry for other delicious recipes, and Christmas food traditions, check out the other posts at Red Writing's blog.
Egg Nog Pie
This recipe is surprisingly light. I usually serve it for dessert for our turkey dinner. If you prepare the graham crust yourself using a non-sugar sweetener, it is suitable for diabetics.
Ingredients:
- Prepared graham pie crust
- 2 cups Calorie reduced Cool Whip
- 1/2 tsp nutmeg
- 1/2 tsp rum extract
- Jello Fat free vanilla pudding mix (sweetened with aspartame)
- 1 cup cold 2 % milk
- marachino cherries , drained (optional)
Prepare the Jello pudding mix with half the milk called for in the directions. Add nutmeg and rum extract. Fold in the Cool Whip. Fill pie crust. Garnish with marachino cherries and a sprinkle of nutmeg. Chill. May be prepared ahead of time and frozen. Just thaw on the day you plan to serve it.
If you are unconcerned about your calorie intake, you could used regular Cool whip and Jello pudding mix.
Chocolate truffles
I made these one year for a Christmas cookie exchange and they were requested every year thereafter. They make great gifts or colourful additions to a goodie tray.
Ingredients:
Directions:

I made these one year for a Christmas cookie exchange and they were requested every year thereafter. They make great gifts or colourful additions to a goodie tray.
Ingredients:
- 3 cups semi-sweet chocolate chips
- 1 (14 ounce) can EAGLE BRAND® Sweetened Condensed Milk (NOT evaporated milk)
- 1 tablespoon vanilla extract
- Coatings:
- Finely chopped toasted nuts, flaked coconut, chocolate sprinkles, colored sprinkles, unsweetened cocoa powder, confectioners' sugar or colored sugars
Directions:
- In large saucepan, over low heat, melt chocolate chips with sweetened condensed milk. Remove from heat; stir in vanilla.
- Pour into medium bowl. Cover and chill 2-3 hours or until firm.
- Shape into 1-inch balls; roll in any of the listed coatings.
- Chill 1 hour or until firm. Store tightly covered at room temperature.
If you are hungry for other delicious recipes, and Christmas food traditions, check out the other posts at Red Writing's blog.
Saturday, October 24, 2009
Finnish Star (snowflake)
For my Christmas Accent Craft I'd like to show you how to make a 3D paper snowflake (sometimes called a Finnish Star).
To make my snowflake I used:
1. paper cutter
2. 1 sheet 8.5 x 11in cardstock
3. glue stick
4. scissors
Cut 12 strips of cardstock 8.5 in long and .5 inch wide.

Take 2 strips and glue them together at their centres to make a big plus sign.

Take 2 more strips and glue them beside the first.

Weave 2 more strips horizontally through the verticle strips and glue them at the intersection points.

Take the top end of the leftmost verticle strip and the left end of the topmost horizontal strip and glue the ends together. The paper will naturally form a curve.

Repeat for the other corners.

Repeat these steps for the other set of 6 strips.

Place the two halves of the snowflake together so that the curves all point towards the centre. Twist the top half so that the points of the curves are aligned over top of a straight strip.

Glue the curved point to the straight strip and cut off the excess paper on the straight strip at the very end.

Repeat for the other 7 points. Voila!!! Your snowflake(Finnish Star) is complete. These would look very pretty with glitter added. You could hang these from a garland or in a window. I might even make some for package decorations for larger gifts.

You can see other lovely Christmas accent crafts at Red Writing's blog.
To make my snowflake I used:
1. paper cutter
2. 1 sheet 8.5 x 11in cardstock
3. glue stick
4. scissors
Cut 12 strips of cardstock 8.5 in long and .5 inch wide.

Take 2 strips and glue them together at their centres to make a big plus sign.

Take 2 more strips and glue them beside the first.

Weave 2 more strips horizontally through the verticle strips and glue them at the intersection points.

Take the top end of the leftmost verticle strip and the left end of the topmost horizontal strip and glue the ends together. The paper will naturally form a curve.

Repeat for the other corners.

Repeat these steps for the other set of 6 strips.

Place the two halves of the snowflake together so that the curves all point towards the centre. Twist the top half so that the points of the curves are aligned over top of a straight strip.

Glue the curved point to the straight strip and cut off the excess paper on the straight strip at the very end.

Repeat for the other 7 points. Voila!!! Your snowflake(Finnish Star) is complete. These would look very pretty with glitter added. You could hang these from a garland or in a window. I might even make some for package decorations for larger gifts.

You can see other lovely Christmas accent crafts at Red Writing's blog.
Subscribe to:
Posts (Atom)
LinkWithin
